Operation: Stop Being Lazy, Step 1

I’ve been feeling like a lazy turd lately and in an effort to not feel like a lazy turd I’ve been pinning random fitness related webpages on Pinterest. Yeah, that doesn’t make me healthier. I know. But tonight Art and I did something, which is better than nothing, and I hope we keep it up. Art’s routine differed a bit for his strengths (and weakness, he tweaked his back the other day), but we essentially did the following:

-25 jumping jacks x 3
-stretch
-10 push ups x 2
-20 sit ups x 2
-10 alternating lunges x 2
-10 bicycle sit ups x 2
-10 second plank on each side
-15 squats x 2
-25 jumping jacks
-stretch
-WATER

This was a modified little version of something I happened across on Pinterest, and if we keep doing something I think I’ll keep adding to these essential basics.

DIY Simple Dollhouse

I used all cheap pine from Home Depot and paints and nails I already had. This project cost me around $20 and took maybe 2 hours total of work.


Materials needed:

(2) 21″ pieces of 1×8

(2) 19″ pieces of 1×4

(3) 19″ pieces of 1×8

(2) 15″ pieces of 1×8

Ability to cut four 45 degree angles on the ends of two boards

Nails/hammer

Paint or other finish (optional)


I bought all my boards at Home Depot and had them do the straight cuts there. I hear that Lowes charges per cut, but Home Depot does it for free. They don’t have the ability to do the 45 degree cuts for the roof pieces though, so I brought those home and instead of using our table saw (since I really only know how to use our scroll saw) I just used our big ol’ belt sander and sanded the edges down until they worked.

The two 15″ pieces of 1×8 are for the roof; the three 19″ pieces of 1×8 are each floor; the two 21″ pieces of 1×8 are the sides; and the two 19″ pieces of 1×4 are the back of the first two floors so the people/dolls don’t fall out. I just used a regular ol’ hammer and nails to piece it all together. If I didn’t hate our screw gun so much I might have screwed it together instead.

After it was assembled, I watered down some regular acrylic paint and brushed it on so it acted like a stain and I could still see the grain and knots in the wood. The colors turned out really bright though so after it dried I rubbed on some furniture repair stain stuff (Restor-A-Finish, specifically) that I had from a previous project and it worked perfectly to dull out the colors so it looks great in our living room now.

Easy project, very fun to do, and a hit with my daughter (it was a Christmas present). Her grandma outfitted it with some Plan Toys classic dollhouse room sets, and I had the Plan Toys dolls ready and waiting too. They compliment it perfectly 🙂

Handmade holidays

Complete with toddler assistance!

I made about 90% of the gifts we’re giving this year, and Lily was involved in the bulk creations along the way.

We did grape jelly (she pulled the grapes off the stems and put them in the pot)
IMG_5208

And apple butter (I don’t think she helped much with this other than eating some of the profits)
IMG_5209

Soap and lotion bars (she helped count the number of scented oil drops going into the pots)
IMG_5210

And crayons with notepads (she helped organize the crayons pre-melting and sort them for wrapping as well)
IMG_5212

Oh, and she helped decorate the brown paper bags for wrapping as well!
IMG_5213

The recipes/instructions for all of these are as follows…

Grape Jelly

From pickyourown.org

-5 lbs of fresh concord grapes
-2 boxes of pectin
-Jarring supplies

Wash the grapes and pick them off the stems. Wash all canning supplies and keep them hot. Mash the grapes with a potato masher and heat in a pot on the stove with just enough water to cover the grapes. Measure the sugar per your pectin’s instructions. I doubled the mount of pectin needed because I knew grape jelly could be funny about setting. Simmer the grapes for 10 minutes and the strain them through a sieve. Add the pectin to the hot grape juice and return to a boil. Stir so it doesn’t burn. Add the sugar and bring to a hard boil for 1 minute. Testing the jell never worked for me, so I just carried on with canning the batch by boiling in a water bath for 5 minutes. This grape jelly took a week or more to set up in the jars at room temperature, but they did, so I suggest you wait it out too if you’re worried that your jelly is runny!


Apple Butter

Also from pickyourown.org

Peel and core a bunch of apples (in my case, half a bushel). Boil apples. Mash them with a potato masher. Boil them some more. Add cinnamon and clove. Boil them some more. Call it apple butter.

Funny, I know, but it really is that simple. Check out Pick Your Own for much more detailed instructions!


Soap

I used melt and pour stuff from the hobby store, but added in ground up oats for some exfoliation, plus a dab of shea butter, and some honey almond scented oil. I poured it into an 8×8 pan and when it was cool I cut it up into bars with a knife and wrapped them individually in waxed paper.


Lotion Bars

Equal parts vegetable oil, vegetable shortening, and beeswax (available at hobby/craft stores). I also added a dab of shea butter and some honey almond scented oil. Melt all the ingredients in a double boiler set up (mine was just a glass bowl on top of a normal pot) and then pour into a 8×8 or 9×13 pan (depending on how much you make). Once it’s cool, use a butter knife to separate it from the dish and cut it into squares. We then packaged them in waxed paper, but they’d likely do just fine out on their own. To use, warm in your hands and rub wherever needs lotion.


Melted Crayons

Organize (leftover, broken, Freecycled, whatever) crayons by color. Cut them into 1″ sections with scissors or a knife and sort into foil cupcake liners. Place liners on a cookie sheet lined with aluminum foil heated to 250F and check every 5 minutes to see if they’ve melted. When they have, remove the pan, let cool, and pop out of foil. I tried using silicon ice cube trays but the crayons stuck. I just thought of perhaps oiling the silicon trays, but I don’t know if I’m brave enough to try again for fear I’ll trash another one.

My latest grain and veggie salad combo

I don’t want to forget this combo I threw together, and it doesn’t hurt sharing it too…

-Farro (it’s a wheat grain, but quinoa or rice would be good too, or if you’re not afraid of gluten, couscous)
-Chickpeas (around twice as much as the grain, I had about 1.5 cups cooked)
-Red bell pepper
-Snap peas
-Feta, crumbled
-Balsamic vinegarette dressing
-(Red onion would taste good too, but I didn’t have any)

Tossed it all together and YUM.

20111220-222111.jpg

Sunny winter day

The local park was mostly fenced off all summer for some remodeling and the fence finally came down recently. We stopped there on our way home from some errands this afternoon and I do believe it gets Lily’s stamp of approval. I won’t be sold until I see the new splash pad water features are installed (the old ones were awesome–slides, fountains…so far there’s a big concrete slab in their place), but I’m hopeful.

Christmas baking extravaganza

Thank you, Pinterest (and Google) for some delicious holiday sweets…

“Coal” – http://sweetpeaskitchen.com/2011/06/15/grand-cayman-no-bake-cookies-and-cream-bars/

Sugar cookies (with sprinkles or royal icing) – http://allrecipes.com/recipe/the-best-rolled-sugar-cookies/

Royal icing – http://allrecipes.com/recipe/royal-icing-i/detail.aspx

And the best thing I’ve ever baked to date?

Cranberry shortbread streusel bars – http://www.evilchefmom.com/2009/11/cranberry-streusel-shortbread-bars.html

That cranberry streusel? Right up my alley. It’s the perfect balance of tart and sweet and crunchy and YUM.

I am now properly exhausted and am going to knit and watch an episode of My So Called Life on Netflix and then sleeeeeeep.

Photo evidence of tonight’s shenanigans…

In spite of a (sprinkle-loving) toddler
IMG_5333
Why yes, that’s an Oreo-butter-marshmallow beard she’s sporting.

Plus a (flour-covered) dog
IMG_5326

We excelled in deliciousness
IMG_5321

$1.49 worth of compliance

Yes, I totally bribed my child to go to the fabric store. When we got home we used some natural “white” glue (I wonder if they dye it tan) and it took forever and a day to dry and it didn’t even stick that well, so I’ll have to find some other use for it and go back to regular ol’ Elmer’s. Anyway, she was pretty proud of her cat and I do believe it was $1.49 well spent for compliance while being indecisive over fabric and thread and subsequently sewing for a few hours while she glued and played.

Even when I try not to rush I still do

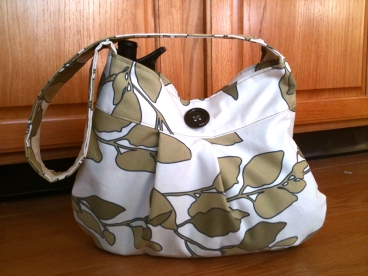
I wanted a new purse, so I made one. We had no other plans today so I dragged Lily to the fabric store and bribed her with a trip to the “kid stuff section” (which I then heard every 27 second during our trip–“kid sexshun? little girl sexshun? we go there now please?”). Pictures of Lily’s project (“pwoshect”) coming soon.

Please note the crooked button/crooked front pleats. I may or may not lop off the button and may or may not reposition it. It took me a little over an hour to finish the bag and it has a pocket, key clippy thingy, and elastic scrunchie to hold my water bottle all sewn in. The lining is a pretty charcoal grey with little grey flowers.

Toddler fashion

Starting from the bottom up: Too-big shoes on the wrong feet, tights/handmade dress/shirt that were worn the day prior and as pajamas overnight (at least we got clean underwear on her?), and the demanded too-thin coat with the handmade sweater underneath to make it warm enough. I love it.

I heart cats

When I was in grade school there was a yearly school store that would arrive this time of year so that students could buy “surprise” presents for their family members. Art has a funny memory of using all the money his mom gave him on toys for himself. Me? Well, I loved cats.

See, both of my parents are allergic to cats. My mom is allergic to just about everything else under the sun, while my dad’s greatest respiratory nemesis is simply cats. And me? I loved cats. I had no allergies and I attempted befriending every stray in the neighborhood (which really never worked, but I like to think I at least got close).

When I received the seasonal school store’s order sheet and saw “I Love Cats Mug” I was ecstatic. I just had to have it! If I couldn’t have an actual cat at least I could have a mug declaring my love for them! What I was going to drink from a ceramic coffee mug at the age of 7, I have no clue, but my mom complied despite their tight budget at the time, and I placed a little X on the sheet.

I remember I bought refrigerator magnets for my grandparents that year that were cheesy shiny plastic squares with pastel-colored stereotypical pastimes (knitting and fishing, respectively) with “World’s Greatest Grandma/pa” in bold black letters. When my grandparents passed away a few years ago I found them still hanging on their fridge.

I have no memory of what trinket I selected for my parents. But I have a very clear memory of the little white cardboard box that housed my mug–my mug that was going to finally declare my passion for felines.

After paying the cash register attendant I stood off to the side in my school’s cafeteria-turned-temporary-store and tore open the box; I couldn’t possibly wait until I got home after school to see my beautiful mug.

And there it was. My mug…

Mocking me.

How could the addition of one little word slash my 7 year old dreams in an instant? Oh, the dramatics of a grade school girl. Oh, the guilt I would conjure up utilizing this mug to my poor allergen-ridden parents who really couldn’t live with a cat. I dreamed of painting over the “my” before stashing it away in the cupboard that held all of my mom’s other coffee mugs.

And there it sat unused for nearly 20 years until I decided to help my mom purge and organize her kitchen. Now I drink my coffee out of it nearly every morning in my own home and I can’t help but laugh at my poor 7 year old self. I hope that I found the humor in it back then like I do now. Additional irony: Art’s allergic to cats too. Why do I surround myself with people who can’t tolerate felines? Whyyy?